Tuesday, September 6, 2011

Garden Update

My garden is growing and it is looking great.  This season truly was weird: it rained for what is seem like the whole month of May and then in June it just quit raining. And trend did not change in July and August; a true lack of rain. My tomato plants are tall and beautiful; my garden  looks more like a tomato forest. Please note the picture below.


But I have to say, overall I am really pleased with my garden this season. I have most everything I would use out there right now. I definitely still have some learning do in the process. Next years, I will have some major changes.

Oh, the salsa has been made, I need to make some more. Anticipation of the salsa, is the highlight for my daughter. I will say 'hey look at the little tomatoes' and she looks at me and says: 'Mmmm, salsa'. And that is really the only thing that she wants from the garden. I hopefully will be making more of salsa and  then some marinara.

I just got some dill, I am so ready for some dill dip with roasted pepper and some Hawaiian bread. I am getting hungry just thinking about it.


Ready to go: in May


The variety stripped paste


One Lazy Dog

Saturday, September 3, 2011

Stuffed Peppers

I really like this recipe. It is easy, healthy and yummy! I have fallen in love with red peppers; they are awesome: sweet, flavorful, and packed with great nutrients. This recipe is Atkins friendly, too! You can add rice to the stuffing; or not if is totally up to you. 


Ingredients: 
·         3- 4 red bell peppers, any color
·         1 tsp of salt
2 t  2 tbsp of the oi
·         Fresh ground pepper
·         1 cup diced Onion
·         ½ cup of diced banana pepper
·         1-2 cloves of diced garlic
·         1 lb of ground turkey
·         1 tbsp chopped fresh oregano or 1 teaspoon of dried oregano
·         1/2 tsp of Worcestershire Sauce


To begin, bring a large pot of water to a boil over high heat. Meanwhile, cut top off peppers 1 inch from the stem end, and remove seeds. Add several generous pinches of salt to boiling water, then add peppers and boil, using a spoon to keep peppers completely submerged. Once the peppers are slightly softened, about 5 minutes in the boiling water. Then drain, set peppers aside to cool.
Preheat oven to 350 degrees F. Heat 2 tbsp of the oil in a large skillet over medium heat. Add onions, banana pepper and cook, stirring often, until soft and translucent, about 5 minutes. Add the garlic and cook a few more minutes. Remove skillet from heat. In a large mixing bowl add meat, tomatoes, and oregano, salt and pepper; then  add the onion, peppers and garlic. Mix well. 
Arrange the cut side of the peppers in a baking dish, then stuff peppers with filling.  Place in oven and bake for 40-50 minutes or til the internal temperature of the stuffed peppers is 150-160°F.


Saturday, August 27, 2011

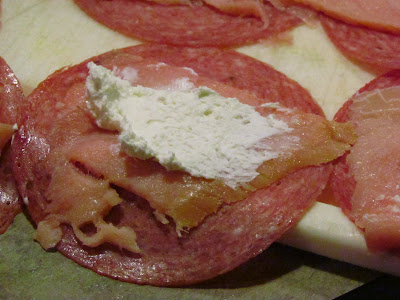
Salmon Salami Rolls

 I am tiring some new. I have been on the Atkins diet for over six weeks and have had some success so far.  I have to tell it is not a diet for the meek. Willpower is key. Giving up sugar and other carbohydrates is challenging. Sure there are perks, like bacon. But overall, it is a difficult diet to follow and if you not follow it exactly, you may end up gaining.  I have a recipe that you can try if you are on the Atkins diet or not. It is a yummy appetizer. 


Recipe:
One package Deli Thin Salami slices
On package Deli Thin Salmon slices
Whipped Cream Cheese
Roasted Red Peppers


The amount really depends on how much you plan on making.  First, take the salami lay on flat surface, place salmon next, spread out 1 teaspoon cream cheese on top of the salmon. Add two of the roasted red peppers and roll up. You can make as many as you like; they are an awesome snack. 


Monday, July 25, 2011

Home made Granola Bars

I love granola bars, they are one of my favorite snacks. I like making them too, because I get to use leftover items in my pantry. (For example: the almost gone dried cranberries, the remaining cup of chocolate chips or the left over Rice Krispies.) One of my friends has a great saying, it's the "back of the refrigerator special". Well this is similar, but the "back of the pantry special".

Recipe:

Base: this is what you need to have it stick together
3 teaspoon of cooking oil
2 cups of marshmallows (the small ones will melt quicker)
½ cup of peanut butter (chucky or smooth)
3 cups of oats

Ideas for Bars:
1/3 cup of Chocolate chips
1/3 cup of dried cranberries
1/3 cup of raisins
1/3 cup of Peanuts, cashews or almonds 
1/3 cup of Rice Krispies  


Preheat oven to 350°. Have a cookie sheet, with aluminum foil, sprayed with cooking spray ready to go. First, heat the oil in a medium sized pan over medium heat. Add the peanut butter and the marshmallows. Once the mixture has melted, slowly start adding the oats. 
Once all the oats have been added, you can pour in the nuts and berries (do not add the chocolate chips yet). After everything is combined (minus the chocolate chips), remove from heat & pour mixture onto cookie sheet. Smooth the mixture out across the cookie sheet to about 1/4"-3/8" thick (I use the back of a greased wooden spoon). Now sprinkle on the chocolate chips & "push" then down into the mixture a little with the spoon. Bake in the oven for 10 minutes. Remove & cool for 10 minutes, then make some space in the frig, put down a few pot-holders & finish cooling in the frig for 1-2 hours. If you used a Stone cookie sheet just slide the granola & foil off onto the pot-holders. Remove from frig, break granola into bite sized chucks. Store in closed container or Zip-lock bags. Enjoy!

 
Some of the ingredients from the "Back of the Pantry"


Don't forget the cooking spray. This stuff WILL stick!

Make sure your Mallows are melting & not cooking.


The mix starts to get thick when adding the oats.


I use a greased wooden spoon to flatten/spread the mixture to about 1/4"-3/8" thick.


We like to store them in bags so you can "grab-n-go".

Tuesday, July 12, 2011

Sarah's Fried Corn

You will need: fresh corn, preferably peaches and cream, an iron skillet. All the other stuff you can fudge.

Recipe:
1/2 cup of butter (you can use margarine)
8-10 fresh corn on the cob; shucked and de-stringed
4-5 teaspoon of salt
1/2 c - 1 c of water
2 teaspoon of white sugar (optional)
1 teaspoon fresh ground pepper (can be the other)

First, start by cutting the corn off the cob. Then place corn in the iron skillet. Turn on the stove top on medium heat, add the butter, salt and pepper (plus sugar if you would like). The corn will start to cook and I add the water once the butter has melted. I believe that water brings out some of the awesome stuff that is in the iron skillet; not sure if it works that way. The whole frying process takes like thirty minutes, until the corn is soft and it will smell totally awesome.


Starting to get awesome!


Sunday, July 3, 2011

Pumpkin Cheeseake


Ingredients:
  • 25-35 gingersnap cookies
  • 1-3/4 cups sugar
  • 4 tablespoons unsalted butter, melted and cooled
  • Three 8-ounce packages cream cheese, cut into chunks and softened
  • 5 large eggs, at room temperature
  • One 15-ounce can pure pumpkin puree
  • 1 tablespoon pure vanilla extract
  • 1 tablespoon pumpkin pie spice
  • 1/2 teaspoon salt
  • Chopped Hazelnuts 


Directions:
  1. Position a rack in the lower third of the oven and preheat to 325°. Lightly coat a 9-inch spring form pan with cooking spray. Using a food processor, grind the cookies with 1/4 cup sugar. Add the butter and pulse to combine. Press the mixture into the bottom and halfway up the sides of the prepared pan. Bake until firm, 3 minutes. Transfer to a rack to cool.
  2. You will have two mixtures: a pumpkin (orange) and a white mixture. Using an electric mixer, beat the cream cheese and remaining 1-1/2 cups sugar until smooth, about 1 minute. Beat in 2 eggs until blended. Transfer 1/4 cup of the cream cheese mixture to a small bowl and set aside. for your orange mixture, add the remaining 3 eggs, the pumpkin, vanilla, pumpkin-pie spice and salt and beat until combined, 2 minutes.
  3. Set the spring form pan with the cooled crust on a double layer of heavy-duty foil and wrap the foil tightly around the bottom and sides; set in a roasting pan. Make sure that no water can get in. Pour the (orange) cheesecake filling into the crust. Then, dollop the reserved (white) cream cheese mixture onto the filling and, using the tip of a knife, swirl together. If you would like add chopped hazelnuts to the outside edge,  Transfer the roasting pan to the oven and fill with enough boiling water to reach about halfway up the sides of the spring form pan. Bake the cheesecake until the center is slightly wobbly but the edges are firm to the touch, about 1-1/4 hours.
  4. Transfer the roasting pan with the cheesecake to a rack and let cool for 45 minutes. Remove the spring form pan, discard the foil and let the cheesecake cool on the rack for 3 hours. Run a knife around the edges to loosen the cake. Wrap the pan in plastic wrap; refrigerate overnight. 
  5. Remove the spring form pan sides. Run a knife under the bottom of the cake to release it, then slide onto a serving platter


Friday, July 1, 2011

Chocolate Chip Muffin Tops

Thanks to my mom who generously give a muffin top pan! Since the gift has come to my house my children have devoured some chocolate chip muffin tops. I did make some blueberry muffin tops, I enjoyed them, however the boys did not so much. So, below is the recipe, you can substitute the chocolate chips with blueberries if you like.

Recipe:

  • Dry Ingredients 
    • 1 3/4 cup of all purpose flour
    • 1/2 cup of brown sugar
    • 2 teaspoons of baking soda
    • 1/2 teaspoon of salt
  • Wet Ingredients 
    • 1 cup of milk 
    • 1/3 cup of applesauce
    • 1 egg
  • 3/4 cup of chocolate chips
Preheat oven at 350 degrees. First, mix your dry ingredients in one bowl. Then mix the wet ingredients in another bowl. Mix the wet and dry together until mixture are well combined, add the chocolate chips. Spoon out the batter into each of the muffin top saucers, fill in up to the top.
Bake at 350 for 22 minutes. Place on cooling rack and let cool. Yield 12 muffin tops.
Oh, the muffin top pan.

Crispy on the bottom..


Thursday, June 30, 2011

Pork Tenderloin


In my family, we all like pork tenderloin. It is a great cut of meat. At the grocery, you can get those pre-seasoned pork tenderloin; and they are good. However, they are filled with crazy amounts sodium and preservatives. I usually buy the pork tenderloin with no season and I cook it in the crock pot with vegetables and potatoes.  So, I have wanted to try something different lately with the pork tenderloin and here it what I have come up with…..

Recipe:
3-4 garlic cloves
Fresh Rosemary ( I used  5 6-inch sprigs, or you can use the whole )
3 teaspoon of olive oil
1 teaspoon of salt
1 teaspoon fresh ground pepper

Mince the fresh garlic. In a large bowl, place the meat in the bowl; pour the oil on top, salt and pepper and rosemary. Then, rub the ingredients into the pork roast, cover the bowl and place in fridge overnight.
 The next day, preheat oven at 400 degrees and place pork on a greased oven baking pan. (You know one of those with a bottom and a top with slits in it.)
Cook in oven for 45 minutes- 1hour til the meat has reached 160 degrees. 


Wednesday, June 29, 2011

Awesome Chocolate Chip Cookies


Everyone at my house loves chocolate chip cookies and to me, handmade chocolate chip cookies are the best. I got this recipe from one of my favorite food blogs: Smitten Kitchen. The recipe was named: Crispy Chewy Chocolate Chip Cookies; needless to say I was already excited.

Recipe: 
2 cups all-purpose flour
1/2 teaspoon baking soda
1/2 teaspoon salt
3/4 cup unsalted butter, melted
1 cup packed brown sugar
1/2 cup white sugar
1 tablespoon vanilla extract
1 egg
1 egg white
2 cups semisweet chocolate chips


Preheat the oven to 325°F. Grease cookie sheets or use Aluminum Foil with Cooking Spray. Mix the flour, baking soda and salt and then sift.  In another bowl, mix together the melted butter, brown sugar and white sugar until well blended. Mix the vanilla, egg, and egg white with the butter/sugar mixture until creamy. Add in the sifted flour mixture slowly until combined. Next, stir in the chocolate chips gently with a spoon. Spoon out cookies about 1 inch in diameter. Bake 13 to 15; this may vary depending on the size of the cookies. Let the cookies cool on the cookie sheet or slide the Aluminum Foil with cookies off onto the counter top for 5 minutes and then move them to a cooling rack. 


1 inch round balls of dough....


Makes a beautiful right sized cookie!! 


Source: http://smittenkitchen.com/2009/03/crispy-chewy-chocolate-chip-cookies/

Not sure if I would have called these cookies chewy or crispy. They were definitely awesome and definitely gone quick!